How to get the SG/MY firmware to run into the TW model of your Nuvi 1350? It's by combining the TW's "Boot.bin" with the SG/MY's "fw1_resources.bin" & "fw_all.bin".
Here come to a set of instructions for flashing the Garmin Nuvi 1350 TW with MY/SG firmware:
STEP 1 - Cook the firmware
Option 1 - Crossing both the Original TW firmware with SG/MY firmware (By yourself)
- Download the Garmin Tools here; There are 3 Tools inside the zip file**
- Download the Garmin SG/MY V3.10 & Garmin TW V3.80 and save them inside a folder. Unzip the downloaded "*.exe" file into 2 different directory.
- Extract the "Garmin Tools.zip" downloaded (1) in the same folder, and run the "RGN_Tool.exe". Open the SG/MY firmware "GUPDATE.GCD" file in the extracted the directory "\nuvi13-14xx_SG_v310\nuvi13-14xx\.System". Then extract the "fw1_resources.bin" & "fw_all.bin" by clicking on the "Save" button on these 2 sections.
- Now open the TW firmware "GUPDATE.GCD" file which was save in the "nuvi1350T_v380\xxxxx\.System" directory. Then in the section of "fw1_resources.bin" & "fw_all.bin", click "Load" and open the saved "*.bin" in (3).
- Tick the options "HWID" & "SW Version" of "Overrides", then copy and paste the HWID and SW Version of the "boot.bin" section on to the fields.
- Click "Save to RGN" to save the "cooked" firmware with the filename "MYSG RGN_Final.rgn" which is ready for flashing into your GPS Device.

** The 3 tools in the "Garmin Tools.zip" file are:
- RGN_Tool.exe - To extract the firmware sections and merging the different firmware sections into a RGN file from the GCD file
- Updater.exe - Tool for flashing the cooked firmware to your GPS Device
- GarminCure3.exe - Curing Tool in case if your GPS Device is bricked
Option 2 - Download the cooked firmware here (TW Boot.bin with MY/SG fw1_resources.bin & fw_all.bin), so you are ready to flash your firmware onto your GPS Device
STEP 2 - Flash the firmware
So now you are ready to flash the cooked firmware into your GPS device:
- Connect your GPS device to the PC, and wait for it to goes into Mass Storage Mode. Backup the "Text" and "Voice" folder into your PC and delete it from the "x:\" Garmin drive. Then open the "x:\.system" folder and delete the "GUPDATE.GCD" if any. "x:\" where "x" is represent your Garmin Device's drive letter. Turn off your Garmin now.
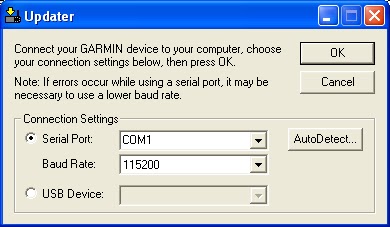
- Run the Updater software by dragging the "MYSG RGN_Final.rgn" into the "Updater.exe".
- Press the left upper corner of your Garmin Device's screen, and plug in the USB cable for connection to your PC (For your device to enter into Pre-boot stage). Without releasing the press on the upper corner, you may found that your device is ready for flashing in the "Updater.exe" on the "USB Device" portion, press "OK" now to proceed for the update.
- Your GPS Device shall now entered into the loader mode now, then you may release your press now and wait for the updating process to complete, it shall take up to few minutes to complete.
- After the completion of update, just unplug your device and switch it off and on again. Your device shall be in SG/MY firmware now and it's enabled for the SG/MY Junction View feature now. You may checking the firmware version now being 3.10 in the System information menu.
Hopefully this guideline would be helpful for those would like to convert the Garmin Nuvi non-SG/MY edition into the SG/MY edition and enjoy the JCV feature as of the local set.
No comments:
Post a Comment